Subtitles Translation 101: Time-Stamping, Time-Coding & Spotting

What you need to know about dialects for voice-over translation
May 4, 2017
When subtitles and voice-over make a great combo localization option
May 11, 2017Time-stamping, time-coding, and spotting are all crucial parts of audio and video workflows, especially for captioning and subtitling services and translation. The terms also get confused with each other, not least because they refer to similar processes – with critical differences. Knowing these differences, and their application, is crucial for the success of video localization projects.
This post will explain time-stamping, time-coding and spotting, how they’re used, and what you need to know to source the correct one for your project.
[Average read time: 5 minutes]
So, what are they?
In general, all three processes involve one thing – adding some kind of timing information to a transcription of the voice-over or other sound elements in audio or video files. What kind of information is added, as well as how it’s added, is what makes them different.
If you’re unfamiliar with time-codes in general, you should check out our previous post, What are time-codes? Do they matter? (Yes!) – it’s good reading before delving into this post, in particular if you don’t understand time-code formats, which will be discussed at length.
Time-stamping
This refers to the process of adding timing markers – also known as time-stamps – to a transcription. The time-stamps can be added at regular intervals, or when certain events happen in the audio or video file. Usually the time-stamps just contain minutes and seconds, though they can sometimes contain frames or milliseconds as well.
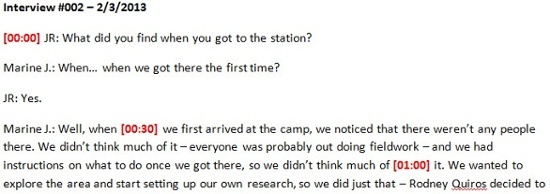
It’s easier to understand if you see it. The following example is a transcription from an interview video. Note that there are red time-stamps indicating when the speaker changes, at 12, 18 and 24 seconds:

These time-stamps are event-based, meaning that they are inserted every time a specific event happens in the video. In this case that event is a “change of speaker,” but it can be many things, like time-stamping every question in an interview, or time-stamping when a specific person appears in the footage, or when someone speaks in a foreign language, etc. Time-stamps can also be in intervals, as in the following example:
Here, the time-stamps just note when the footage gets to the 30-second and 1-minute mark – these particular ones are are added in 30-second intervals.
Both kinds of time-stamps – event and interval-based – are useful for finding content in the source footage. For example, on documentaries directors write editing instructions on the time-stamped transcriptions, which editors can then use to find the footage relatively easily. Same thing with court transcriptions of testimony – lawyers can use the time-stamps to find the exact audio and video they want to play for a jury.
Remember that time-stamps are generally used to help humans navigate through long audio and video files – therefore, they don’t have to be more accurate than minutes and seconds, and they’re attuned to what people actually need to find. Because of this, time-stamp content, interval length, and format can vary, sometimes substantially.
Time-coding
Time-coding refers to gathering actual timing information as well. Unlike time-stamps, though, time-codes are always frame-accurate – that is to say, they also contain frames or milliseconds, and follow a particular format.
Time-codes are often gathered for captioning and subtitling, it’s crucial to note that this isn’t always the case. They have multiple uses, usually ones that require frame-accurate or millisecond-accurate timings. For example, in lip-sync dubbing, gathering the time-codes of the English-language loops can help sound engineers lay down markers quickly – but again, only if the time-codes are in the correct, frame-accurate format.
For more information about loops check out our previous post, What is an audio loop? Why is filenaming crucial to localization?)
The following example adds loop marker time-codes to our above script.

Note that this time-coded script could be used in the studio for an audio voice-over production – however, it could not be used for a subs project.
Spotting
Spotting is collecting time-codes and formatting them specifically for video subtitle services or closed captioning. This means that not only must the time-codes be in the right format, but that the final time-coded file must be formatted also so that it can be used as a captioning or subtitling file.
In the following example, we’ve spotted the interview transcription from above into the SRT format:

Note that this spotted file has time-codes for both when then caption should appear and when it should disappear, and that it adheres to a strict segmentation. It also breaks down the voice-over transcript into smaller sections, and adds line-breaks, which some are preferable for some languages. (For example, most Japanese subtitles deliverables add them.)
So where does confusion come from?
To start, from the fact that the three terms have much in common. After all, spotting is just a very specific kind of time-coding, and time-coding is most commonly done specifically for spotting projects. In fact, time-coding and spotting are almost always used interchangeably, though spotting is more prevalent in entertainment contexts, while time-coding is more common in online and e-Learning contexts. That said, it’s still crucial to understand the difference to avoid issues.
In particular, remember that time-stamps standards used for online media platforms – especially for e-Learning and web animations – will not work for spotting. For example, some video systems and programs like Brainshark can import timings lists, applying these time-stamps to animation elements. Same for PowerPoint – users can adjust timings in the Animations panel, usually to align each one to an audio voice-over element. The issue with those time-stamps is that they’re not time-codes – meaning that they’re not frame-accurate, and can’t really be leveraged for spotting projects.
So how do you make sure you get the right service for your project?
There are three ways to do that:
- Work with a professional source like JBI Studios. This is probably the best piece of advice in this post. With the advent of non-professional time-stamping and captioning platforms online, it may be tempting to farm out the time-coding to someone in your office – but this can lead to integration and encoding issues down the line. Remember that one time-code in the wrong format, an additional tab, or an additional space somewhere, or a time-code out of sequence – just one of these elements out of place in your entire file will thwart integration. Fixing this kind of error after translation can be very costly.
- Specify the final deliverable format that you’ll need – if you know it. If you need an SRT delivery, use that format name specifically. If your time-stamps are for a prosecutor’s evidence, say it – especially if you need it in a particular, court-mandated format. Even better, if you have a sample of that format, send it to your studio – especially since some formats, like TTML for subs, allow you to change metadata and formatting within them.
- Or, specify how your time-codes or time-stamps will be used. If you know how your videos will be used, a professional studio will usually be able to help with the format. Need subs for 28 languages for YouTube? SRT is probably your best option. Captions for a DVD authored in Adobe Encore? Then tab-delimited text is the best deliverable, unless you have language-support issues, in which case a graphics & text combo may be better. Same thing with time-stamps – for example, and expert transcriptionist knows the little things that he or she can do to make an editor’s life better when adding time-stamps, like noting long pauses, or adding stamps when there are non-verbal events in a video. But only if he or she knows that the time-stamps are specifically for editing.
Specificity is the key here. Professional transcription studios like JBI can adjust to most client requests. More importantly, they can come up with a workflow test, to make sure that the time-stamped, time-coded or spotted files will work fully with your final integration. Remember that this requires a little time up front to test the workflows, and as well to adjust them if any issues come up. But it’s well worth it – as with most audio and video translation, proper preparation is the best way to keep projects on time, on scope, and on budget.
